If you're reading this, you're probably already aware of MinIO's fall from grace. The open source community's favorite object storage system was officially archived back in April (2026, for future readers). The impending deficit of security patches and bug fixes has since sent many sysadmins looking for a maintained alternative.
If you're one of the affected individuals, I'd like to take the opportunity to introduce you to Predastore!
My team and I have been working on this project for around a year and a half now. Long before the crescendo of the MinIO saga. The original motivation was to build an object storage system capable of operating in resource constrained edge environments with an unreliable network fabric.
Although there is still plenty of work to be done to soundly meet that goal, the project in its current state happens to fit the more standard use cases (that MinIO excelled in) rather well!
By the end of this article, you will hopefully have a clear understanding of the process of migrating from a MinIO deployment to a brand new Predastore cluster.
An architectural overview
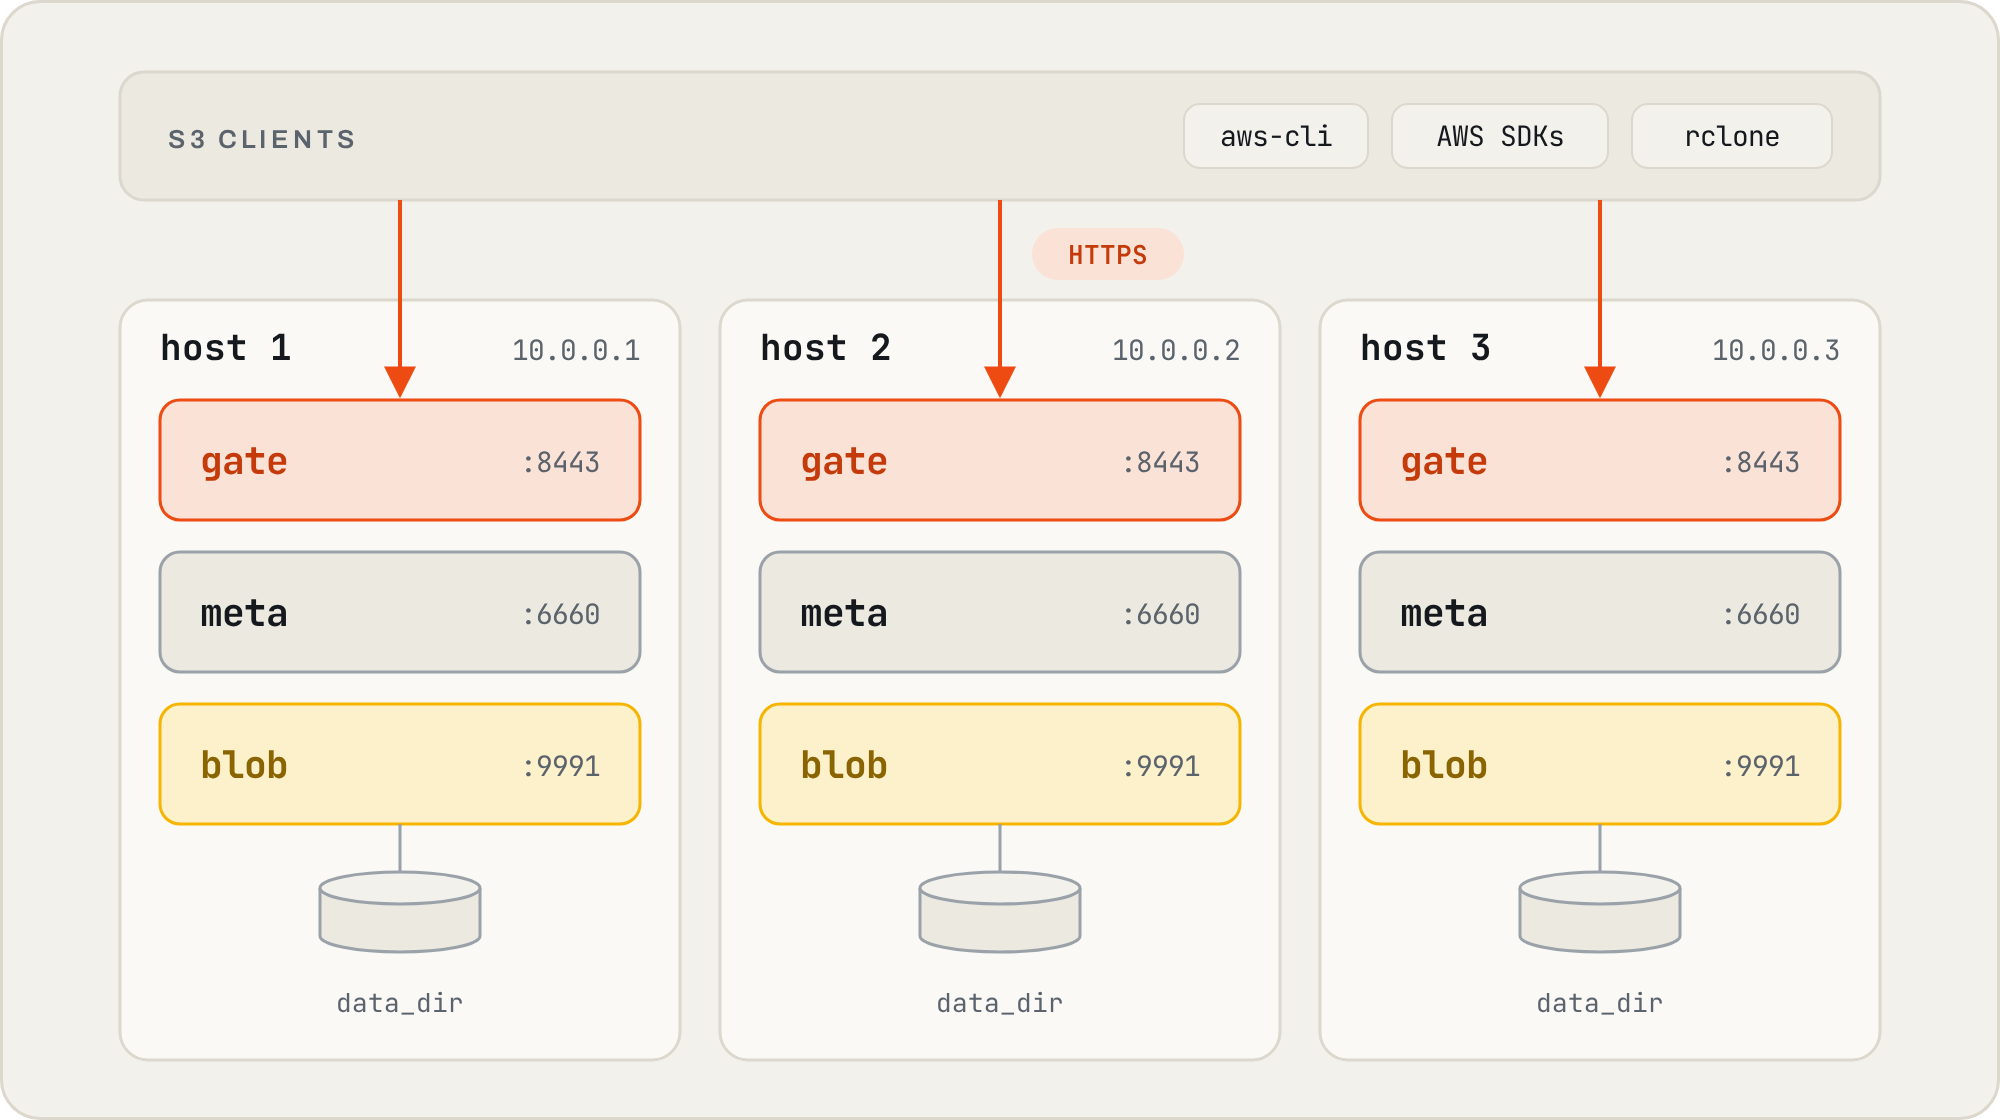
Note: Everything in this section is subject to change. Predastore is a fairly young project, and certain design decisions have not been set in stone yet. For example, I'm not particularly sold on the "blob" terminology yet. If anyone has any better ideas, please raise a GitHub issue! It will make my day.
In order to start building a mental model of how MinIO concepts map to Predastore, a rudimentary of understanding of Predastore itself is required. This will be rather brief. If you want the meatier details, check out the design doc located here.
A Predastore cluster is organized into two levels; hosts, and nodes. A
host is just a single Predastore process, invoked via s3d.
Each host can contain any number of nodes, where each node has a role
that is one of:
- gate - Exposes the S3 HTTP API. There may be at most one gate node per host process.
- meta - A Raft replica holding bucket and object records, including where every object's shards live.
-
blob - A key-value store that writes encrypted,
erasure-coded shards to append-only segment files. The directory to
which a blob node reads/writes is set using the
data_dirfield in the config file.
Each host gets its own IP address, and each node within a single host binds to a separate port under the host IP address. This ensures that every node is individually addressable.
A cluster must contain at least one of each type of node. Additionally, it is highly recommended that each blob node is pointed at a separate disk to ensure proper isolation.
Before you begin: what Predastore doesn't currently do
MinIO was a mature project, with many years spent adding support for all manner of features provided by S3. Predastore is rather young as of yet, and while we support the main body of features required by most deployments, there are a number of things still on the TODO list.
Before proceeding with the following steps, take a moment to skim the S3 API coverage page here to ensure Predastore isn't missing an operation your use case depends on.
If something you're after is absent, please notify my team and me by raising a GitHub issue. We're pretty responsive. Depending on the request, there's a good chance we'll be able to slip it into a minor release.
1. Pick a mode: standalone or under Spinifex
The first step in the process is to decide whether your new Predastore cluster is going to be deployed standalone, or via Spinifex. This is usually a fairly simple choice, depending on your desired authentication structure. The general capabilities of each method:
- Standalone - A fixed set of service accounts, one tenant, no external dependencies. Manual distribution of keys and certificates to nodes during setup.
- Via Spinifex - IAM users/groups/roles, STS, multiple tenants. Automatic distribution of keys and certificates to member nodes.
I highly recommend taking a moment to peruse the "Standalone or Spinifex?" section of Predastore's README for guidance on which path to take.
2. Stand up Predastore
The exact installation steps you should follow depend on the structure of your pre-existing MinIO cluster. Use the tabs below to show the steps that match your deployment topology and chosen mode of installation.
Single-Node Single/Multi-Drive - Standalone
This is the simplest path, and the closest equivalent to a single MinIO
server. You'll need a Linux machine running systemd, along with Go (1.27
or newer), git, make, and openssl
in order to build Predastore from source. Most distro packages of Go are
a few versions behind, so you may need to grab it from go.dev. You'll also want the AWS CLI for
checking Predastore once it's up.
Build and install
First up, clone the repository and build the s3d binary:
git clone --branch v1.21.0 https://github.com/mulgadc/predastore.git
cd predastore
make build
Note: This guide was written against v1.21.0. The install tooling
used below (make install, predastore-keygen,
and the example config) first shipped in v1.20.0, so don't go any older
than that.
Install it, along with its systemd service:
sudo make install
Then create the dedicated predastore user, and the config
and data directories (/etc/predastore and
/var/lib/predastore respectively):
sudo systemd-sysusers && sudo systemd-tmpfiles --createShare MinIO's drives
There's no need for new drives. Predastore can live on the ones MinIO is
already using, in a directory of its own alongside MinIO's data, until
you're done with MinIO in step 5. Each drive needs roughly as much free
space again as MinIO is using on it, plus some headroom for re-syncs,
which df -h will tell you.
The steps below assume MinIO's drives are mounted at
/mnt/disk1, /mnt/disk2, and so on. If they're
pooled with RAID or ZFS, treat the pool as a single drive.
For each drive, create a directory for Predastore. The leading
. matters, as MinIO treats any other top-level directory on
its drives as a bucket, and will delete it along with that bucket.
sudo install -d -o predastore -g predastore -m 0700 /mnt/disk1/.predastore
The service isn't permitted to write anywhere outside
/var/lib/predastore, so bind-mount each directory into it.
The extra options make sure the service waits for the mount, and refuses
to start without it:
sudo install -d -m 0755 /var/lib/predastore/disk1
echo '/mnt/disk1/.predastore /var/lib/predastore/disk1 none bind,nofail,x-systemd.requires-mounts-for=/mnt/disk1,x-systemd.required-by=predastore.service,x-systemd.before=predastore.service 0 0' | sudo tee -a /etc/fstab
Once every drive has its line in /etc/fstab, mount them:
sudo systemctl daemon-reload
sudo mount -a
Note: Leave /var/lib/predastore/disk1 and friends owned
by root. If a mount ever goes missing, that's what stops Predastore from
quietly writing to the system disk in its place.
Match your MinIO setup
Predastore ships with an example config that already describes a working single-drive host, so there isn't a great deal to change. Copy it into place, and open it up in your editor of choice:
sudo cp /etc/predastore/predastore.toml.example /etc/predastore/predastore.toml
sudo $EDITOR /etc/predastore/predastore.toml
For the purposes of the migration, there are only two fields you need to
set. region needs to match whatever your MinIO clients are
configured with, as S3 clients sign every request for a specific region.
[[auth]] holds the access key and secret your applications
will use.
Keep in mind that these are root credentials, with full access to every bucket in the cluster (as mentioned in the standalone vs Spinifex discussion).
region = "us-east-1"

[[auth]]
access_key_id     = "<access-key>"
secret_access_key = "<secret-key>"
account_id        = "100000000001"
The example config also includes an example-bucket entry,
which you can go ahead and delete.
Next, point the blob nodes at the drives. If MinIO only had one drive,
set data_dir = "/var/lib/predastore/disk1" on the
example's blob node, and the config is done.
Otherwise, replace the example's single blob node with one blob node per
drive. Give each one its own id and port, and point its own
data_dir at the drive's bind mount.
Leave the host's data_dir as it is, since the meta node
doesn't name a directory of its own and keeps its state under
/var/lib/predastore on the system disk. With three drives,
the [[host]] block ends up looking like this:
[[host]]
id = 1
addr = "127.0.0.1"
admin_port = 9099
data_dir = "/var/lib/predastore"
tls_cert = "/etc/predastore/server.pem"
tls_key = "/etc/predastore/server.key"
encryption_key = "/etc/predastore/master.key"

  [[host.node]]
  id = 1
  role = "gate"
  port = 8443
  bind_addr = "0.0.0.0"

  [[host.node]]
  id = 2
  role = "meta"
  port = 6660

  [[host.node]]
  id = 3
  role = "blob"
  port = 9991
  data_dir = "/var/lib/predastore/disk1"

  [[host.node]]
  id = 4
  role = "blob"
  port = 9992
  data_dir = "/var/lib/predastore/disk2"

  [[host.node]]
  id = 5
  role = "blob"
  port = 9993
  data_dir = "/var/lib/predastore/disk3"
Finally, set [rs] to match. Each object is split into
data shards plus parity shards, each on a
different drive, so parity is the number of drives you can
lose, and data + parity can't exceed the number of drives.
RS(2,1) across three drives will survive losing any one of them (for two
drives, use RS(1,1)). Your data survives, but the service won't start
while a drive's bind mount is missing, so mount the replacement drive at
the same path, recreate its .predastore directory, and run
sudo mount -a before restarting. [rs] can't be
changed once objects have been written, so make sure you're happy with
it before moving any data across.
The configuration reference covers the details.
[rs]
data   = 2
parity = 1
Generate keys and a certificate
Generate the key used to encrypt data at rest, along with a self-signed
TLS certificate. PREDA_SAN should list every hostname and
IP address your clients will use to reach Predastore, otherwise they'll
refuse to trust the certificate when you come to copy data across. It
replaces the default list rather than adding to it, so include
DNS:localhost and IP:127.0.0.1 if you'll also
be connecting from the machine itself.
sudo PREDA_SAN="DNS:s3.example.com,IP:192.0.2.10" predastore-keygen /etc/predastore
Note: Make sure to back up /etc/predastore/master.key
somewhere separate from your data backups. Without it your data is
unreadable, but storing it alongside the data backups defeats the
purpose of encrypting at all.
Start the service
Enable and start the service, then follow its logs to make sure it comes up without any errors:
sudo systemctl daemon-reload
sudo systemctl enable --now predastore
sudo journalctl -u predastore -f
Note: A few warnings while the nodes start up are normal, such as the gate reporting it isn't ready yet. It's errors, and the service restarting, that you're looking out for.
Check it's up
With the service running, it's worth confirming that Predastore is reachable, and that your client and cluster agree on the region.
The certificate is only readable by the predastore user, so
copy it somewhere your own user can read (and over to any other machine
you'll be running clients from). The rest of this guide uses this copy:
sudo install -m 0644 -o "$USER" /etc/predastore/server.pem ~/predastore-ca.pem
Point the AWS CLI at the credentials from your [[auth]]
entry, and at the certificate:
export AWS_ACCESS_KEY_ID=<access-key>
export AWS_SECRET_ACCESS_KEY=<secret-key>
export AWS_CA_BUNDLE=~/predastore-ca.pem
Then create, list, and remove a test bucket. Listing buckets alone won't catch a region mismatch, which is why the check creates one.
aws s3 mb s3://predastore-test --endpoint-url https://s3.example.com:8443 --region us-east-1
aws s3 ls s3://predastore-test --endpoint-url https://s3.example.com:8443 --region us-east-1
aws s3 rb s3://predastore-test --endpoint-url https://s3.example.com:8443 --region us-east-1
If all three commands complete without any errors, your Predastore
cluster is ready for data. If you see AuthorizationHeaderMalformed
... incorrect region, the region your client is signing for
doesn't match the one Predastore was set up with.
Multi-Node Multi-Drive - Standalone
This path is the equivalent of a distributed MinIO deployment. Every machine runs the same config file, and shares a single TLS certificate and encryption key.
The steps below assume three machines at 10.0.0.1,
10.0.0.2, and 10.0.0.3, but the process is the
same for any number of them. You'll need Go (1.27 or newer),
git, make, and openssl on each
machine, as well as the AWS CLI on at least one of them for checking the
cluster once it's up.
Build and install
On every machine, clone the repository and build the s3d
binary:
git clone --branch v1.21.0 https://github.com/mulgadc/predastore.git
cd predastore
make build
Note: This guide was written against v1.21.0. The install tooling
used below (make install, predastore-keygen,
and the example config) first shipped in v1.20.0, so don't go any older
than that.
Install it, along with its systemd service:
sudo make install
Create the dedicated predastore user, and the config and
data directories:
sudo systemd-sysusers && sudo systemd-tmpfiles --create
make install also ships some kernel network settings. Hosts
on separate machines talk to each other over QUIC, and need larger
socket buffers than most distros provide by default. Without them,
writes will start failing under load, with no obvious indication as to
why. Apply them:
sudo sysctl --systemShare MinIO's drives
There's no need for new drives. Predastore can live on the ones MinIO is
already using, in a directory of its own alongside MinIO's data, until
you're done with MinIO in step 5. Each drive needs roughly as much free
space again as MinIO is using on it, plus some headroom for re-syncs,
which df -h will tell you.
The steps below assume each machine's MinIO drives are mounted at
/mnt/disk1, /mnt/disk2, and so on. If they're
pooled with RAID or ZFS, treat the pool as a single drive. The pool
covers a failed drive, and Predastore covers a failed machine.
On every machine, create a directory for Predastore on each drive. The
leading . matters, as MinIO treats any other top-level
directory on its drives as a bucket, and will delete it along with that
bucket.
sudo install -d -o predastore -g predastore -m 0700 /mnt/disk1/.predastore
The service isn't permitted to write anywhere outside
/var/lib/predastore, so bind-mount each directory into it.
The extra options make sure the service waits for the mount, and refuses
to start without it:
sudo install -d -m 0755 /var/lib/predastore/disk1
echo '/mnt/disk1/.predastore /var/lib/predastore/disk1 none bind,nofail,x-systemd.requires-mounts-for=/mnt/disk1,x-systemd.required-by=predastore.service,x-systemd.before=predastore.service 0 0' | sudo tee -a /etc/fstab
Once every drive has its line in /etc/fstab, mount them:
sudo systemctl daemon-reload
sudo mount -a
Note: Leave /var/lib/predastore/disk1 and friends owned
by root. If a mount ever goes missing, that's what stops Predastore from
quietly writing to the system disk in its place.
Describe the cluster
A single config file describes the entire cluster, with one
[[host]] block per machine. Each host gets its own address,
its data directory, key, and certificate paths, and its own gate, meta,
and blob nodes. Node ids must be unique across the whole file, not just
within a host.
region needs to match whatever your MinIO clients are
configured with, as S3 clients sign every request for a specific region.
[[auth]] holds the access key and secret your applications
will use.
Keep in mind that these are root credentials, with full access to every bucket in the cluster (as mentioned in the standalone vs Spinifex discussion).
[rs] determines how objects are spread across the machines.
Each object is split into data shards plus
parity shards, each on a different blob node. RS(2,1)
across three machines will survive losing any one of them.
Check out the configuration reference for the full format.
version = 1
region  = "us-east-1"

[rs]
data   = 2
parity = 1

[[host]]
id   = 1
addr = "10.0.0.1"
admin_port = 9099
data_dir = "/var/lib/predastore"
tls_cert = "/etc/predastore/server.pem"
tls_key = "/etc/predastore/server.key"
encryption_key = "/etc/predastore/master.key"

  [[host.node]]
  id = 1
  role = "gate"
  port = 8443
  bind_addr = "0.0.0.0"

  [[host.node]]
  id = 2
  role = "meta"
  port = 6660

  [[host.node]]
  id = 3
  role = "blob"
  port = 9991

[[host]]
id   = 2
addr = "10.0.0.2"
admin_port = 9099
data_dir = "/var/lib/predastore"
tls_cert = "/etc/predastore/server.pem"
tls_key = "/etc/predastore/server.key"
encryption_key = "/etc/predastore/master.key"

  [[host.node]]
  id = 4
  role = "gate"
  port = 8443
  bind_addr = "0.0.0.0"

  [[host.node]]
  id = 5
  role = "meta"
  port = 6660

  [[host.node]]
  id = 6
  role = "blob"
  port = 9991

[[host]]
id   = 3
addr = "10.0.0.3"
admin_port = 9099
data_dir = "/var/lib/predastore"
tls_cert = "/etc/predastore/server.pem"
tls_key = "/etc/predastore/server.key"
encryption_key = "/etc/predastore/master.key"

  [[host.node]]
  id = 7
  role = "gate"
  port = 8443
  bind_addr = "0.0.0.0"

  [[host.node]]
  id = 8
  role = "meta"
  port = 6660

  [[host.node]]
  id = 9
  role = "blob"
  port = 9991

[[auth]]
access_key_id     = "<access-key>"
secret_access_key = "<secret-key>"
account_id        = "100000000001"
Save it as /etc/predastore/predastore.toml on every
machine.
Since every machine shares the same config file, each one needs telling
which [[host]] block describes it. That lives in
/etc/predastore/predastore.env. On each machine, copy the
example into place, and open it up:
sudo cp /etc/predastore/predastore.env.example /etc/predastore/predastore.env
sudo $EDITOR /etc/predastore/predastore.env
Set PREDA_HOST_ID to the id of the [[host]]
block that describes this machine, so 1 on
10.0.0.1, 2 on 10.0.0.2, and so
on. The rest of the file can be left as it is.
PREDA_HOST_ID=1
Next, point the blob nodes at the drives. If each machine only has one
drive, add data_dir = "/var/lib/predastore/disk1"
to every host's blob node, and the config is done.
Otherwise, give each host one blob node per drive, each with its own id,
port, and data_dir pointing at the drive's bind mount.
Leave each host's data_dir as it is, since the meta node
keeps its state there.
With two drives per machine, host 1 looks like this, and hosts 2 and 3 follow the same pattern with node ids 5 to 8 and 9 to 12:
[[host]]
id   = 1
addr = "10.0.0.1"
admin_port = 9099
data_dir = "/var/lib/predastore"
tls_cert = "/etc/predastore/server.pem"
tls_key = "/etc/predastore/server.key"
encryption_key = "/etc/predastore/master.key"

  [[host.node]]
  id = 1
  role = "gate"
  port = 8443
  bind_addr = "0.0.0.0"

  [[host.node]]
  id = 2
  role = "meta"
  port = 6660

  [[host.node]]
  id = 3
  role = "blob"
  port = 9991
  data_dir = "/var/lib/predastore/disk1"

  [[host.node]]
  id = 4
  role = "blob"
  port = 9992
  data_dir = "/var/lib/predastore/disk2"
Finally, set [rs] to match, which needs some care.
Predastore spreads an object's shards across distinct blob nodes, but
doesn't take into account which machine each blob node lives on, so two
shards of the same object can land on two drives in the same machine.
To survive losing a whole machine, parity needs to be at
least the number of drives per machine, and data + parity
can't exceed the total number of drives. For three machines with two
drives each, RS(2,2) survives losing any one machine. [rs]
can't be changed once objects have been written, so make sure you're
happy with it before moving any data across.
[rs]
data   = 2
parity = 2
Generate keys and a certificate
Every machine in the cluster needs to share the same TLS certificate and the same encryption key. This one is a bit of a trap; machines with their own certificates never manage to form a cluster.
So rather than running predastore-keygen on each machine
straight away, generate the files once on a single machine and
distribute them yourself.
On one machine, generate a self-signed certificate. Make sure
subjectAltName lists every machine's address, as well as
the hostname your clients will use:
sudo openssl req -x509 -newkey rsa:2048 -nodes -days 825 -subj '/CN=predastore' \
  -addext "subjectAltName=DNS:s3.example.com,IP:10.0.0.1,IP:10.0.0.2,IP:10.0.0.3" \
  -keyout /etc/predastore/server.key -out /etc/predastore/server.pem
On the same machine, generate the encryption key:
sudo sh -c 'umask 0177 && openssl rand -out /etc/predastore/master.key 32'
Copy server.pem, server.key and
master.key into /etc/predastore on every other
machine, using something that preserves file permissions, such as
scp -p. Predastore refuses to start if either key is
readable by anyone other than its owner, so if in doubt, tighten them up
on each machine once they've landed:
sudo chmod 0600 /etc/predastore/master.key /etc/predastore/server.key
Then, on every machine, run predastore-keygen. It keeps the
copied files, and sets their ownership:
sudo predastore-keygen /etc/predastoreStill on every machine, add the certificate to the system trust store, so each host trusts the others:
sudo cp /etc/predastore/server.pem /usr/local/share/ca-certificates/predastore.crt
sudo update-ca-certificates
Note: The trust store commands above are for Debian and Ubuntu. For
RHEL and Fedora, see the Standalone
TLS Trust section of the README. As with the single node setup, make
sure to back up master.key somewhere separate from your
data backups.
Start the service
On every machine, enable and start the service, then follow its logs:
sudo systemctl daemon-reload
sudo systemctl enable --now predastore
sudo journalctl -u predastore -f
Until every machine is up, the ones that started first will log errors about not being able to reach the others, which is expected. Once the service is running on every machine, the hosts will find each other and elect a leader, and those errors should stop. From then on, it's errors and the service restarting that you're looking out for.
Check it's up
With the cluster running, it's worth confirming that Predastore is reachable, and that your client and cluster agree on the region. Run the following from any one of the machines.
s3.example.com should point at every machine's gate, not
just one, either with a DNS record per machine or a load balancer in
front of them. Clients only talk to the gates that name resolves to, so
if it names a single machine, losing that machine takes Predastore
offline for your applications, even though the rest of the cluster
carries on.
The certificate is only readable by the predastore user, so
copy it somewhere your own user can read (and over to any other machine
you'll be running clients from). The rest of this guide uses this copy:
sudo install -m 0644 -o "$USER" /etc/predastore/server.pem ~/predastore-ca.pem
Point the AWS CLI at the credentials from your [[auth]]
entry, and at the certificate:
export AWS_ACCESS_KEY_ID=<access-key>
export AWS_SECRET_ACCESS_KEY=<secret-key>
export AWS_CA_BUNDLE=~/predastore-ca.pem
Then create, list, and remove a test bucket. Listing buckets alone won't catch a region mismatch, which is why the check creates one.
aws s3 mb s3://predastore-test --endpoint-url https://s3.example.com:8443 --region us-east-1
aws s3 ls s3://predastore-test --endpoint-url https://s3.example.com:8443 --region us-east-1
aws s3 rb s3://predastore-test --endpoint-url https://s3.example.com:8443 --region us-east-1
If all three commands complete without any errors, your Predastore
cluster is ready for data. If you see AuthorizationHeaderMalformed
... incorrect region, the region your client is signing for
doesn't match the one Predastore was set up with.
Single-Node Single/Multi-Drive - Via Spinifex
A caveat before you start: Spinifex currently keeps all of Predastore's data on a single drive. While MinIO is still running, that means picking one of MinIO's drives to hold everything, which limits Predastore to that drive's capacity, with no protection against losing it. If MinIO's drives are already pooled with RAID or ZFS, the pool counts as one drive and keeps its redundancy. Support for spreading Predastore across multiple drives under Spinifex is on its way. Until then, if you need to survive a failed drive and can live without IAM, the standalone path is the better fit.
If you've gone with Spinifex, Predastore comes along for the ride. It's installed and configured as part of Spinifex, so there's no need to set it up separately.
On a single node, Spinifex runs Predastore with one blob node and RS(1,0), which means a single copy of each object with no parity.
Run the installer
Before installing, make sure the machine has a Linux bridge configured for VM networking. The bridge setup guide walks through setting one up.
Run the installer:
curl -fsSL https://install.mulgadc.com | bash
Then set up OVN networking. --management also starts OVN's
central services, which a single node needs to run itself:
sudo /usr/local/share/spinifex/setup-ovn.sh --managementInitialize the node
Initializing the node generates Predastore's config, keys, and
certificates for you. Just like the standalone setup,
--region needs to match your MinIO clients, as Spinifex
defaults to ap-southeast-2.
sudo spx admin init --node node1 --nodes 1 --region us-east-1Share one of MinIO's drives
Predastore can live on one of the drives MinIO is already using, in a directory of its own alongside MinIO's data, until you're done with MinIO in step 5. Pick the drive with the most free space, as it needs enough room for a full copy of your data, plus some headroom for re-syncs.
The steps below assume that drive is mounted at /mnt/disk1.
Create a directory for Predastore on it. The leading .
matters, as MinIO treats any other top-level directory on its drives as
a bucket, and will delete it along with that bucket.
sudo install -d -o spinifex-storage -g spinifex -m 0700 /mnt/disk1/.spinifex-predastore
Predastore's service isn't permitted to write anywhere outside
/var/lib/spinifex/predastore, so bind-mount the directory
over it. The extra options make sure the service waits for the mount,
and won't write to the system disk without it:
sudo chown root:root /var/lib/spinifex/predastore
sudo chmod 0755 /var/lib/spinifex/predastore
echo '/mnt/disk1/.spinifex-predastore /var/lib/spinifex/predastore none bind,nofail,x-systemd.requires-mounts-for=/mnt/disk1,x-systemd.required-by=spinifex-predastore.service,x-systemd.before=spinifex-predastore.service 0 0' | sudo tee -a /etc/fstab
sudo systemctl daemon-reload
sudo mount -a
Start the services
Start Spinifex's services, Predastore included:
sudo systemctl start spinifex.target
Spinifex's certificate only covers the machine's own hostname and
addresses. If your clients will reach Predastore by any other name, such
as s3.example.com, add it to the certificate, and restart
the services to pick it up:
sudo spx admin cert renew --extra-dns s3.example.com
sudo systemctl restart spinifex.target
Check it's up
With Spinifex running, it's worth confirming that Predastore is reachable, and that your client and cluster agree on the region.
Copy Spinifex's CA certificate somewhere your own user can read (and over to any other machine you'll be running clients from). The rest of this guide uses this copy:
sudo install -m 0644 -o "$USER" /etc/spinifex/ca.pem ~/predastore-ca.pem
Point the AWS CLI at the spinifex profile created during
setup, which takes care of the credentials, and at your copy of the
certificate:
export AWS_PROFILE=spinifex
export AWS_CA_BUNDLE=~/predastore-ca.pem
Then create, list, and remove a test bucket. Listing buckets alone won't catch a region mismatch, which is why the check creates one.
aws s3 mb s3://predastore-test --endpoint-url https://s3.example.com:8443 --region us-east-1
aws s3 ls s3://predastore-test --endpoint-url https://s3.example.com:8443 --region us-east-1
aws s3 rb s3://predastore-test --endpoint-url https://s3.example.com:8443 --region us-east-1
If all three commands complete without any errors, your Predastore
cluster is ready for data. If you see AuthorizationHeaderMalformed
... incorrect region, the region your client is signing for
doesn't match the one you passed to spx admin init.
Multi-Node Multi-Drive - Via Spinifex
A caveat before you start: Spinifex currently keeps all of each machine's Predastore data on a single drive. While MinIO is still running, that means picking one of MinIO's drives on each machine, which limits each machine's share of Predastore to that drive's capacity. Predastore's erasure coding still covers a failed machine, and it treats a failed drive as a failed machine, but there's no protection against losing a drive beyond that. If MinIO's drives are already pooled with RAID or ZFS, the pool counts as one drive and keeps its redundancy. Support for spreading Predastore across multiple drives under Spinifex is on its way. Until then, if you need to survive more failed drives than failed machines and can live without IAM, the standalone path is the better fit.
Setting up a multi-node Spinifex cluster involves a fair bit more than Predastore alone, including configuring OVN networking on each server.
Rather than repeating all of it here, I'll point you to Spinifex's multi-node install guide for the full procedure, and only call out the parts that matter for the migration.
Spinifex runs one Predastore blob node per machine, so its erasure coding protects you against losing a machine.
Follow the install guide
Work through steps 1 to 3 of the multi-node guide, which cover installing Spinifex, setting the node IP variables, and configuring OVN networking on each server.
Form the cluster
Step 4 of the guide forms the cluster, with one change;
--region needs to match your MinIO clients, on both the
init and every join. Spinifex picks the erasure coding for you, using
RS(1,1) for two machines and RS(2,1) for three or more.
On server 1, initialize the cluster:
sudo spx admin init --force --node node1 --nodes 3 \
  --bind $SPINIFEX_NODE1 --cluster-bind $SPINIFEX_NODE1 \
  --port 4432 --region us-east-1 --az us-east-1a
While init is still running, join each other server, using the token
from init's output. Change --node and the bind addresses to
match each server:
sudo spx admin join --force --node node2 \
  --bind $SPINIFEX_NODE2 --cluster-bind $SPINIFEX_NODE2 \
  --host $SPINIFEX_NODE1:4432 --token <token-from-init-output> \
  --region us-east-1 --az us-east-1a
Share one of MinIO's drives
On each machine, Predastore can live on one of the drives MinIO is already using, in a directory of its own alongside MinIO's data, until you're done with MinIO in step 5. Pick the drive with the most free space, as it needs roughly as much room as MinIO is using across all of that machine's drives combined, plus some headroom for re-syncs.
The steps below assume that drive is mounted at /mnt/disk1.
On every server, create a directory for Predastore on it. The leading
. matters, as MinIO treats any other top-level directory on
its drives as a bucket, and will delete it along with that bucket.
sudo install -d -o spinifex-storage -g spinifex -m 0700 /mnt/disk1/.spinifex-predastore
Predastore's service isn't permitted to write anywhere outside
/var/lib/spinifex/predastore, so on every server,
bind-mount the directory over it. The extra options make sure the
service waits for the mount, and won't write to the system disk without
it:
sudo chown root:root /var/lib/spinifex/predastore
sudo chmod 0755 /var/lib/spinifex/predastore
echo '/mnt/disk1/.spinifex-predastore /var/lib/spinifex/predastore none bind,nofail,x-systemd.requires-mounts-for=/mnt/disk1,x-systemd.required-by=spinifex-predastore.service,x-systemd.before=spinifex-predastore.service 0 0' | sudo tee -a /etc/fstab
sudo systemctl daemon-reload
sudo mount -a
Start the services
Finish off with steps 5 and 6 of the multi-node guide to start the services and verify the cluster.
As with a single node, Spinifex's certificates only cover each server's
own hostname and addresses. If your clients will reach Predastore by any
other name, such as s3.example.com, add it on every server,
and restart the services to pick it up:
sudo spx admin cert renew --extra-dns s3.example.com
sudo systemctl restart spinifex.target
Check it's up
With the cluster running, it's worth confirming that Predastore is reachable, and that your client and cluster agree on the region. Run the following on server 1.
Copy Spinifex's CA certificate somewhere your own user can read (and over to any other machine you'll be running clients from). The rest of this guide uses this copy:
sudo install -m 0644 -o "$USER" /etc/spinifex/ca.pem ~/predastore-ca.pem
Point the AWS CLI at the spinifex profile created during
setup, which takes care of the credentials, and at your copy of the
certificate:
export AWS_PROFILE=spinifex
export AWS_CA_BUNDLE=~/predastore-ca.pem
Then create, list, and remove a test bucket. Listing buckets alone won't catch a region mismatch, which is why the check creates one.
aws s3 mb s3://predastore-test --endpoint-url https://s3.example.com:8443 --region us-east-1
aws s3 ls s3://predastore-test --endpoint-url https://s3.example.com:8443 --region us-east-1
aws s3 rb s3://predastore-test --endpoint-url https://s3.example.com:8443 --region us-east-1
If all three commands complete without any errors, your Predastore
cluster is ready for data. If you see AuthorizationHeaderMalformed
... incorrect region, the region your client is signing for
doesn't match the one you passed to spx admin init.
3. Recreate identities and access
With Predastore up and running, the next step is to give your applications a way in. How you go about this depends on the mode you picked back in step 1.
Standalone
Standalone Predastore has no concept of users or policies. Access is
controlled entirely by the [[auth]] entries in
predastore.toml, and every one of them is a root
credential. So the job here is fairly simple.
Add an [[auth]] entry for each access key your applications
currently use against MinIO. You're free to reuse the same key and
secret values, which means your applications won't need new credentials
when you switch them over.
On a multi-node cluster, make the same change to the config on every machine.
[[auth]]
access_key_id     = "<existing-minio-access-key>"
secret_access_key = "<existing-minio-secret-key>"
account_id        = "100000000001"
Then restart the service (on each machine, for a multi-node cluster) to pick it up:
sudo systemctl restart predastoreNote: If you relied on MinIO policies to restrict what each application could access, there's no standalone equivalent. That's what Spinifex is for.
Via Spinifex
Spinifex implements AWS-compatible IAM, so MinIO's users, groups, and policies map across fairly directly. All of the commands below use the standard AWS CLI, pointed at Spinifex via the profile created during setup.
For more detail on any of them, check out Spinifex's IAM guide.
export AWS_PROFILE=spinifexExport your MinIO policies
MinIO policies are written in the same JSON format as AWS IAM policies, so in most cases they can be carried over as-is.
List the policies on your MinIO deployment:
mc admin policy list myminioThen export each of your custom policies to a file:
mc admin policy info myminio <policy-name> --policy-file <policy-name>.jsonBefore importing them, there are a few things worth checking for, as Spinifex only supports a subset of the IAM policy language:
-
MinIO-specific actions such as
admin:*andkms:*mean nothing to Predastore, and should be removed. Spinifex doesn't check action names, so it will accept them without complaint. MinIO'sadmin:*statements usually have noResource, though, which Spinifex does reject, withResource is required. -
NotActionandNotResourcearen't supported yet. UseActionandResourcewith an explicit list instead. A statement with only aNotActionorNotResourceis rejected withAction is requiredorResource is required. -
Condition keys are limited to
aws:SourceIp,aws:SecureTransport,aws:username,aws:userid,aws:PrincipalAccount,aws:PrincipalType, ands3:prefix. The only supported operators areStringEquals,StringLike,IpAddress, andBool, so conditions using the likes ofStringNotEqualswill need rewriting. -
Policy variables are limited to
${aws:username},${aws:userid}, and${aws:PrincipalAccount}. MinIO's${jwt:*}and${ldap:*}variables won't carry over.
Create the policies
Create each policy from its exported file:
aws iam create-policy --policy-name <policy-name> --policy-document file://<policy-name>.json
The good news is that Spinifex loudly refuses a policy that uses an
unsupported element, condition, or variable. So if one of those slips
through, create-policy will fail with a
MalformedPolicyDocument error telling you what needs
changing. Unrecognised actions are the exception, as mentioned above.
Recreate your users and groups
Each MinIO user and group gets an IAM equivalent, with the same policies attached. You'll need your account ID for the policy ARNs, which this will tell you:
aws sts get-caller-identityCreate each user, and attach their policies:
aws iam create-user --user-name alice
aws iam attach-user-policy --user-name alice \
  --policy-arn arn:aws:iam::<account-id>:policy/<policy-name>
Create each group, attach its policies, and add its members:
aws iam create-group --group-name developers
aws iam attach-group-policy --group-name developers \
  --policy-arn arn:aws:iam::<account-id>:policy/<policy-name>
aws iam add-user-to-group --group-name developers --user-name alice
Issue new access keys
MinIO won't hand over existing secret keys, and Spinifex generates its own, so each user will need a fresh key pair. The secret is only shown once, so make sure to save it somewhere safe.
aws iam create-access-key --user-name aliceNote: Buckets belong to the account that creates them. When you come to copy data across in the next step, use a key belonging to the account you want to own the buckets.
4. Move the data
Now for the main event. To copy your data from MinIO to Predastore, I recommend using rclone.
You might be tempted to reach for mc mirror, and it does
work, but with MinIO archived, mc is no longer maintained
and its official downloads have been taken down. rclone on the other
hand is actively maintained, packaged for pretty much every distro, and
lets you set the region explicitly on both ends.
Install rclone
Install it on a machine that can reach both MinIO and Predastore:
sudo -v ; curl https://rclone.org/install.sh | sudo bashConfigure both ends
rclone needs a remote for each side. Add the following to
~/.config/rclone/rclone.conf, filling in your own endpoints
and keys. force_path_style is required, as Predastore only
supports path-style requests, and region needs to match the
one you set up Predastore with.
If you went with Spinifex, use a key belonging to the account you want
to own the buckets. The spinifex profile's own key, in
~/.aws/credentials, belongs to the account created during
setup.
[minio]
type = s3
provider = Minio
endpoint = https://minio.example.com:9000
access_key_id = <minio-access-key>
secret_access_key = <minio-secret-key>
region = us-east-1

[predastore]
type = s3
provider = Other
endpoint = https://s3.example.com:8443
access_key_id = <predastore-access-key>
secret_access_key = <predastore-secret-key>
region = us-east-1
force_path_style = true
Confirm both remotes work by listing their buckets:
rclone lsd minio:
rclone lsd predastore: --ca-cert ~/predastore-ca.pem
Copy each bucket
Copy a bucket by creating it on the Predastore side, then filling it
with rclone sync. rclone only creates a bucket when it has
something to put in it, so without the mkdir an empty
bucket would quietly get left behind.
--checksum compares objects by their hash rather than their
modification time, and --metadata carries across user
metadata (x-amz-meta-*) and Content-Type.
rclone's --ca-cert flag applies to both remotes at once,
not just Predastore. If your MinIO is served over HTTPS, passing
Predastore's certificate on its own will stop rclone from trusting
MinIO, so pass the system's CA bundle alongside it (on RHEL and Fedora,
that's /etc/pki/tls/certs/ca-bundle.crt):
rclone mkdir predastore:<bucket> --ca-cert ~/predastore-ca.pem
rclone sync minio:<bucket> predastore:<bucket> \
  --checksum --metadata --progress \
  --ca-cert /etc/ssl/certs/ca-certificates.crt --ca-cert ~/predastore-ca.pem
Note: rclone sync makes the destination match the
source, which means deleting anything in the destination that isn't in
the source. Always name the bucket on both sides, and never run it
against the root of the remotes, as that will clear out anything in
Predastore that MinIO doesn't know about. If in doubt, add
--dry-run first to see what it would do.
To copy every bucket in one go:
for bucket in $(rclone lsf --dirs-only minio: | tr -d /); do
  rclone mkdir "predastore:$bucket" --ca-cert ~/predastore-ca.pem
  rclone sync "minio:$bucket" "predastore:$bucket" \
    --checksum --metadata --progress \
    --ca-cert /etc/ssl/certs/ca-certificates.crt --ca-cert ~/predastore-ca.pem
done
Check the copy
Check each bucket with rclone check.
--download reads every object from both sides and compares
the actual contents. It's slow for large buckets, but it's the most
reliable way to be sure.
rclone check minio:<bucket> predastore:<bucket> --download \
  --ca-cert /etc/ssl/certs/ca-certificates.crt --ca-cert ~/predastore-ca.pem
A successful check reports 0 differences found.
5. Switch clients over and check the result
With the data across, all that's left is to point your applications at Predastore. It's worth doing this in a sensible order, so that nothing written to MinIO in the meantime gets left behind.
Stop writes to MinIO, and run a final sync
Stop your applications from writing to MinIO (or put them into maintenance mode), then run the copy from step 4 one last time to pick up anything that changed since.
Compare the two sides
Before switching anything over, check that both sides agree on the number of objects and the total size of each bucket:
rclone size minio:<bucket>
rclone size predastore:<bucket> --ca-cert ~/predastore-ca.pem
Update your clients
For most clients, switching over comes down to a handful of settings:
-
Endpoint -
https://<predastore-host>:8443. Predastore only speaks HTTPS, so anyhttp://endpoints will need updating along with the host and port. -
Region - Whatever you set during setup in step 2. A
mismatch shows up as an
AuthorizationHeaderMalformederror on every bucket and object request. - Credentials - Unchanged if you reused your MinIO keys on a standalone deployment. Otherwise, the new keys from step 3.
-
Addressing style - Predastore only supports
path-style requests (
https://host:8443/bucket/key), not virtual-hosted ones (https://bucket.host:8443/key). Most SDKs have an option for this, such asaddressing_stylein boto3,forcePathStylein the JavaScript SDK, andUsePathStylein the Go SDK. -
Certificate trust - If you're using a self-signed
certificate, clients need to trust it. That's the
~/predastore-ca.pemcopy made when you checked the cluster was up in step 2.
For example, an AWS CLI profile for Predastore in
~/.aws/config looks something like this:
[profile predastore]
region = us-east-1
endpoint_url = https://s3.example.com:8443
ca_bundle = /home/<you>/predastore-ca.pem
aws_access_key_id = <access-key>
aws_secret_access_key = <secret-key>
s3 =
  addressing_style = path
Note: Any presigned URLs generated before the switch point at MinIO, and won't carry over. Your applications will need to generate new ones against Predastore.
Keep MinIO around for a little while
Once your applications are happily talking to Predastore, I'd recommend leaving MinIO running in a read-only state for a while before decommissioning it. That way, if anything turns out to be missing, the original is still there to fall back on.
Retire MinIO
Once you're confident nothing is missing, stop MinIO for good, and delete its data to hand the space over to Predastore. Predastore carries on running throughout, and there's nothing to restart. Under Spinifex, only the drive holding Predastore's data gains anything for now, and the rest are free for other uses.
If MinIO was pointed at a directory on each drive, such as
/mnt/disk1/minio, delete that directory on every drive:
sudo rm -r /mnt/disk1/minio
If MinIO was pointed at the drive itself, delete its
.minio.sys directory, along with a directory for each of
your buckets, naming them explicitly:
cd /mnt/disk1 && sudo rm -r .minio.sys <bucket> <bucket> ...
Note: Resist the temptation to reach for rm -r
/mnt/disk1/*. It misses .minio.sys, and if
Predastore's directory is ever missing its leading ., it'll
take your freshly migrated data with it.
Closing thoughts
Hurray! Hopefully that went smoothly for you. If it didn't, raise a GitHub issue so we can help you out.
We've got plenty of features and improvements planned for Predastore, so be sure to keep your eyes on the release page.
I've got other articles in the works as well, focusing more on the design rationale behind the system. Stay tuned for those. That's all for this one!